Today someone asked me if it’s possible to host a Hugo site on AWS that is only accessible from their company IP. Of course it is, let me explain how.
Setting up the S3 bucket
Before we can deploy we will need to set up the S3 bucket to ensure that it is secure from the start. For a pace of change, I will use the Console to demonstrate what is needed here instead of the CLI.
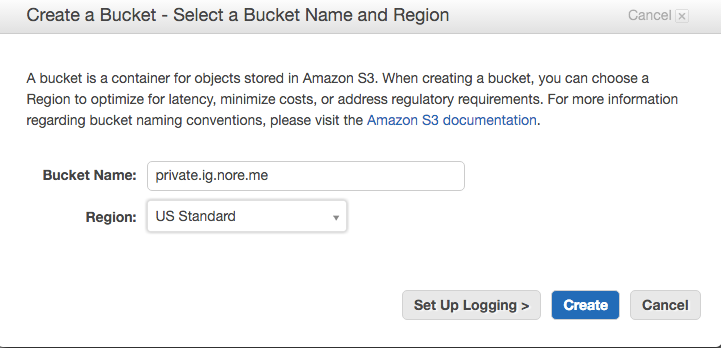
After logging into the Console, we go to the S3 section and create our new bucket using the big blue button.

Obviously you need to select the region closest to your location, but the interesting part is actually the name.
S3 allows you to use vanity names, that is you can configure your DNS in such a way that it will point to a bucket. The advantage of this is that you can use URLs like private.ig.nore.me instead of the default AWS name, in this case private.ig.nore.me.s3-website-us-east-1.amazonaws.com. I’m sure you can see the advantage of that. One requirement for that however is that your bucket name needs to be exactly the same as the URL you wish to use. After that it’s just a matter of changing your DNS as explained in this AWS article. While the article demonstrates it using Route53, you can do the same with your own DNS provider.
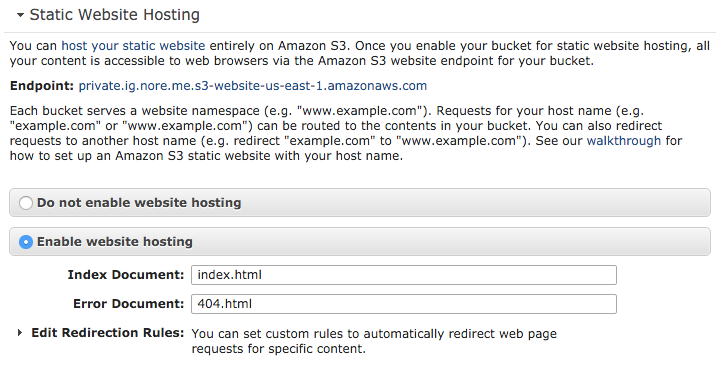
So, now we have our bucket. First, we should enable the site hosting. This is an option in the properties of your bucket. You can see these by clicking on the looking glass icon next to the bucket.

For a Hugo site (and most other static sites), just select the Enable website hosting section and fill in index.html as the Index document and 404.html as the Error document.
Now a site can be hosted on the bucket, but we’re not done yet. You now need to limit the access. By default S3 buckets are limited to access only be the person who created it, but we want to whitelist one IP to have access to the site as well. We’ll do this using a Bucket policy. You can find this in the section about Permissions, which is at the top of the properties.

Here you will have the ability to generate a policy, use an example one, or type one yourself. To save you some clicking, you can just copy the below code in that field. Just remember to change the bucketname and IP address1.
{
    "Id": "Policy1457144327911",
    "Version": "2012-10-17",
    "Statement": [
        {
            "Sid": "Stmt1457144326044",
            "Action": [
                "s3:GetObject"
            ],
            "Effect": "Allow",
            "Resource": "arn:aws:s3:::private.ig.nore.me/*",
            "Condition": {
                "IpAddress": {
                    "aws:SourceIp": "203.121.203.121"
                }
            },
            "Principal": "*"
        }
    ]
}
From this point on, anything in the bucket is only available to people coming from that IP. Please note, you can use wildcards for the IP so if your company has a range of 203.121.203.* you can use that. Similarly, you can comma separate multiple values like 203.121.203.121,203.121.203.122. Also, the ids used above don’t have any meaning, but you can’t have multiple policies with the same id.
Configuring Wercker to deploy here
Setting up Wercker to deploy a Hugo site is described in the Hugo documention so I’m not going to repeat everything about that here. Instead I’ll only point out the differences. First, we need a deploy step for S3. Wercker kindly offers one, so we’ll use that one.
deploy:
  steps:
    # Execute the s3sync deploy step, a step provided by wercker
    - s3sync:
        key_id: $AWS_ACCESS_KEY_ID
        key_secret: $AWS_SECRET_ACCESS_KEY
        bucket_url: $AWS_BUCKET_URL
        source_dir: public/
The values for the variables are set in the Wercker config (again, see the aforementioned tutorial for how to do this). The bucket_url is your bucketname prefixed with s3://, for example s3://private.ig.nore.me. The other two are the AWS keys, aka security credentials. You can generate these keys in your AWS IAM settings. If this is the first time you do so, I recommend creating a separate user that only has permissions to upload things to your S3 bucket and having a look at the best practices for managing these secrets.
When you now deploy the site, it will only be accessible from the IP address we specified earlier. And that’s all there is to it.
-
No, that’s not my actual current IP address. ↩︎
Read more like this:
- EC2 Instance Naming Explained
- Automating a CloudFormation deployment visualisation dashboard
- All the cool stuff from re:Invent (aka a Serverless re:Cap)
- 2022 AWS Re:Invent; Important Highlights Between the Keynotes
- Top highlights from AWS pre:Invent 2022 we're most excited about
Or always get the latest by subscribing through RSS, Twitter, or email!
