Pipelines seems to be almost as popular as machine learning right now and earlier this week Atlassian announced that Bitbucket now has them built in as well. Or rather, it’s in beta. Naturally, I was interested so I decided to take it for a spin. This article shows how I set it up for one of my existing projects, and I’ll go into the good parts and the limitations.
Why does this matter?
I’ve briefly touched on the new pipeline workflows for both Jenkins and Wercker recently1, but having similar capabilities built into Bitbucket is quite a big deal. Jenkins and Wercker are both dedicated CI/CD tools, and therefore require special management on a separate tool. Having a good build system that lives in the same place as your repositories on the other hand is far more convenient and will hopefully make more people willing to use it.
Instead of coming up with a fancy name, Atlassian decided to keep it clear and simply calls this new functionality Pipelines. Atlassian already has a dedicated CI/CD service called Bamboo, but they’ll be shutting this down in favor of Pipelines. Bamboo was a paid service, and it’s likely that Pipelines will become paid in the future2 as well but in the beta period it’s free.
How does it work?
Please keep in mind that it’s still an early stage of the beta (barely 2 days in) so it’s possible and even likely that things will change.
The first thing to do is obviously apply for a spot in the beta. My application went through pretty fast, so they either have a lot of capacity or not many people have applied yet because it’s so new. Obviously, the sooner you apply the better, so before you continue reading apply.
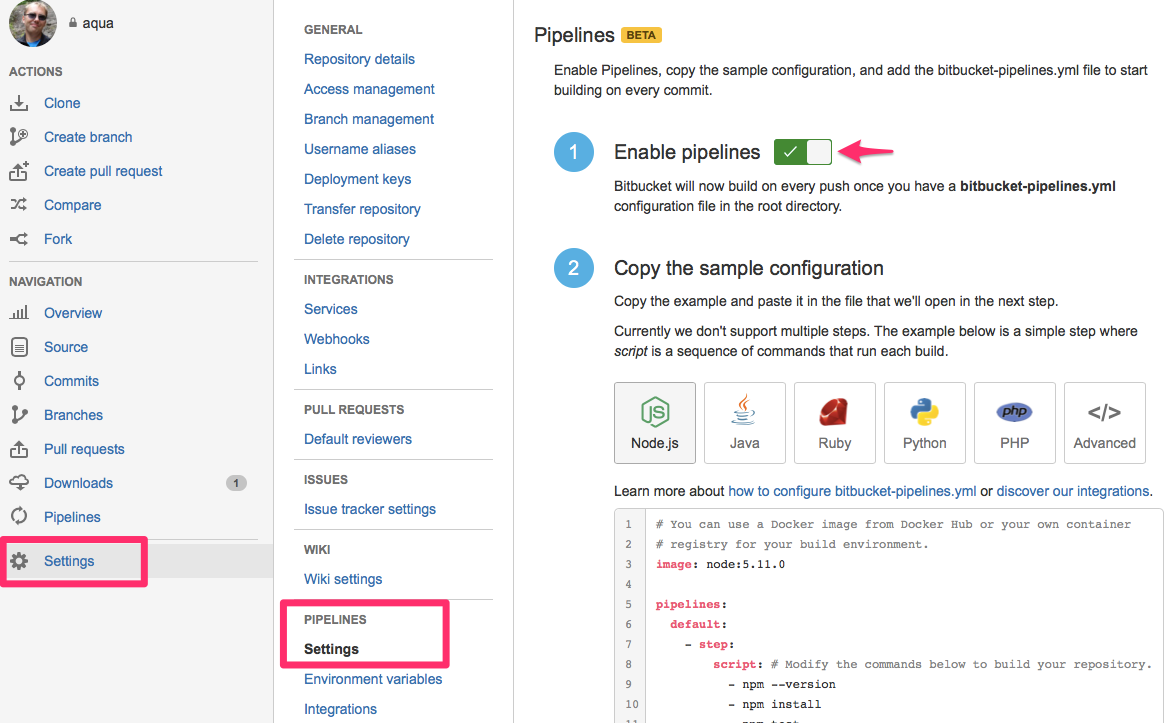
The next step is to enable it for your project by going to Settings -> Pipelines -> Settings and flip the big switch there. Alternatively, you can also reach this page by clicking on the Pipelines link and then the Configure Pipelines button that shows up there. Obviously you will need to have administration rights for the repository.

Below the switch are a couple of examples to get you started. The whole system works by using a single yaml file called bitbucket-pipelines.yml. Nice and easy, and obviously good for version control. The yaml file needs to be present in the root of the project (just like with every other CI/CD tool) and its structure is probably familiar as well.
Pipelines is Docker based so you start with defining an image. Or not, as it’s optional. If you don’t define an image it will use a default Bitbucket Docker container that is based on the Ubuntu 14.04 image. It is also possible to override the image for specific branches, and as far as I can see there are no limitations on the source of the Docker containers. You don’t need to use containers stored on Docker Hub, and private containers are just as easy to use as public ones. Have a look at the documentation to see how to use these.
Another strength is the configuration of branches. There are two ways here: you can have a default section which everything defaults to, and you can have a branches section where you define specific branches and what needs to happen there. The best part of this is that these branch names support globbing so you can have features/* for all your feature branches. The most specific name will probably be used, with default only being used if no branches actually match.
Inside these you then define a single step3. This step has optionally a different image, but always needs a script section which is basically a list of commands that need to be run. The below example is shamelessly adapted from the official documentation, and shows all of what I mentioned.
image: node:5.11.0
pipelines:
  default:
    - step:
        script:
          - echo "This script runs on all branches that don't have any specific pipeline assigned in 'branches'."
          - echo "You can have multiple commands in a single script list"
  branches:
    master:
      - step:
          script:
            - echo "This script runs only on commit to the master branch."
    feature/*:
      - step:
          image: java:openjdk-9 # This step uses its own image
          script:
            - echo "This script runs only on commit to branches with names that match the feature/* pattern."
Using it in practice
There are examples provided for projects written in various programming languages, so I decided instead to try it with a language that isn’t one of these. I figured that my Aqua project is a good use case. I already have an existing setup for it in Wercker so I could simply adapt that for Pipelines instead. Because Pipelines isn’t as advanced (yet) as Wercker, I decided to limit what I do. Some of these limitations can be overcome by using my own Docker containers, but I wanted to see what can be achieved by just using the yaml configuration.
So, I only do the following things:
- Run go tests
- Build the application for use in Lambda
- Zip everything up in a Lambda ready file
- Upload this file to the Downloads section of the Bitbucket repository
The major things I therefore skip are the cross compiling for various platforms and uploading the file to Lambda. All of this is possible, but either includes a fair number of extra commands and/or adding other files to the repository.
image: golang
pipelines:
  default:
    - step:
        script:
          - mkdir -p /go/src/github.com/ArjenSchwarz/aqua
          - mv * /go/src/github.com/ArjenSchwarz/aqua
          - apt-get update
          - apt-get install -y zip
          - cd /go/src/github.com/ArjenSchwarz/aqua
          - go get -t ./...
          - go test ./...
          - GOOS=linux GOARCH=amd64 go build -a -ldflags '-s' -o lambda/aqua
          - mkdir dist
          - zip -j dist/aqua_lambda.zip lambda/aqua lambda/index.js
          - cd dist
          - curl -v -u $BB_ACCESS -X POST https://api.bitbucket.org/2.0/repositories/$BITBUCKET_REPO_OWNER/$BITBUCKET_REPO_SLUG/downloads/ -F files=@aqua_lambda.zip
As this is only for testing, I didn’t set up anything for the various branches but kept it as simple as possible. Usually you don’t want the deployments to run for every branch after all. The script is I ended up with is pretty straightforward; I start by moving everything into the GOPATH and installing dependencies, both for the build and Aqua. Next is the build process, and finally I push everything up to the downloads section. You can also see that I make use of several environment variables in the API call, the BITBUCKET prefixed ones are provided by Pipelines itself while the other one I defined myself.

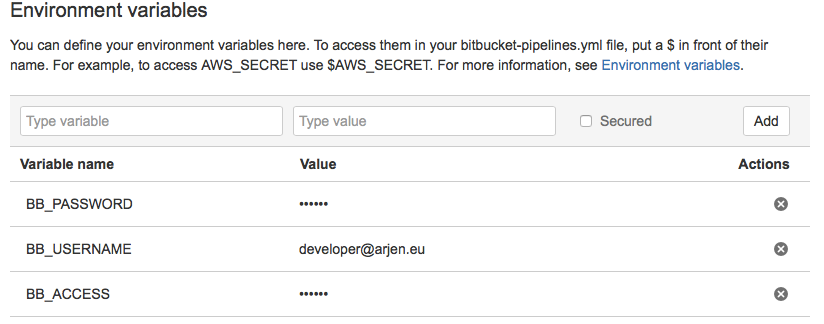
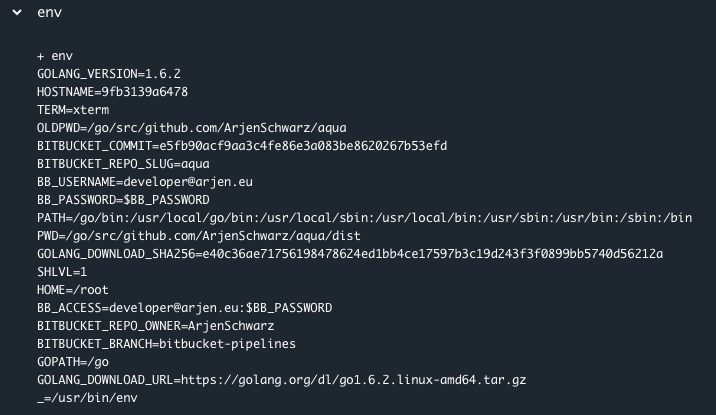
Environment variables can easily be configured in the settings4, and offer a secure flag. This secure flag is treated well with the values being properly hidden when you run env or similar commands.

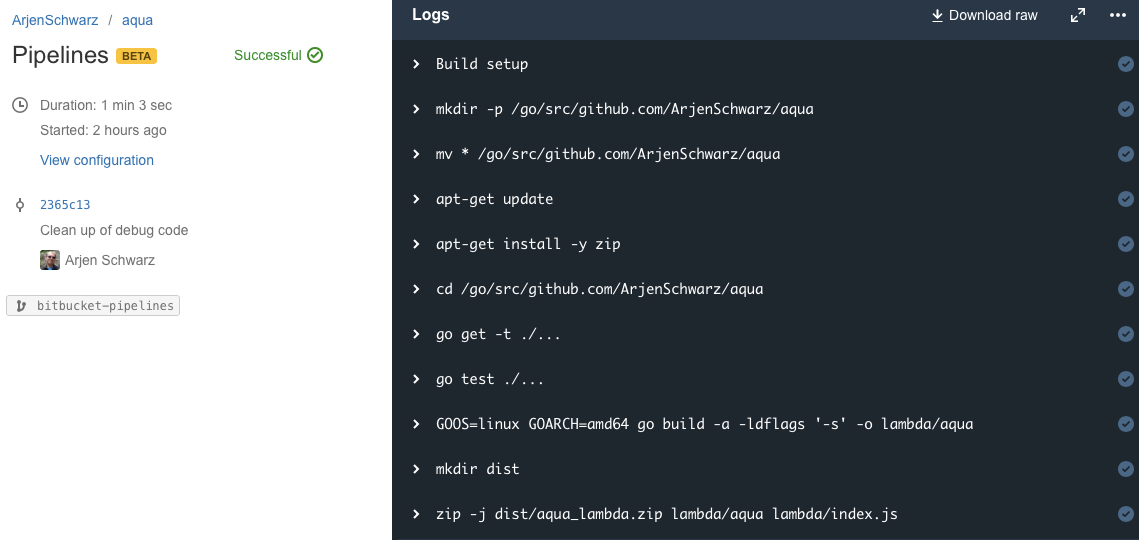
Pipelines also shows a nice list of the various times you’ve triggered a build, with a clear success or fail status. The below shows a couple of my attempts at playing with it.

There is also a log overview available if you click on one of these. This provides all the commands being run as well as their output which are shown when you click on the command. You can even change the background color of the log, although that doesn’t seem to persist.

Limitations
Setting up this configuration took a couple of hours, and a lot of that was figuring out what does and doesn’t work. Doing so I therefore ran into a number of limitations and things I’d like to see improved. There is a list of known limitations already (which includes things like building Docker containers) but there were others I ran into. I provided these to Atlassian using their bug tracker, but I’ll list my main points here as well.
No inheritance
#12749 - Inheritance/extending of steps
The downside of the branches/default structure is that only ever one path will be chosen. That means if you have an extensive build configuration, but your master branch should also do a deployment, you will need to define this whole setup multiple times. Defining the same thing in multiple places will eventually almost always end up causing issues, so I’d really like it if there was some sort of inheritance structure possible. Maybe a way to define an all: section with shared commands, or an extend: command.
Just one step
Having one step per section is annoying as it means you can’t organize your commands properly. Everything turns into one long list, without a way to see why something is done. Splitting a list up in sections like prepare, build, and deploy will make this far more legible and therefore more maintainable. I suspect this is something they’ll be looking at regardless of my feature request.
Only a script option
#12751 - Allow more capable steps that can be reused
Right now it’s only possible to write a script, or rather a list of commands. To make it a lot more powerful I’d love to see them offer the ability to use custom steps that you can share across projects. For example, the AWS integration for posting something to Lambda right now involves adding a file to your project and installing its dependencies through your yaml file. Having a specific and reusable step that includes all the requirements to do this instead allows for far greater flexibility.
Conclusion
Despite the limitations I mentioned above, Pipelines is a great start. There are certainly some things that I believe can be improved, but a lot of what I mention above also depends on what Atlassian wants to do with it. If it’s supposed to become a full-fledged CI/CD server those things seem to be a requirement5, but if it’s aimed at being a good first step into the CI/CD world that you can then follow up with using a different system it’s probably already there.
In fact, if you don’t mind building your own Docker containers to run the builds there isn’t really anything you can’t do. You can include the dependencies in there, and even call some prepared bash files that ensure none of my previously mentioned limitations apply.
I for one am looking forward to seeing where this goes.
-
I’ll do similar articles on these soon. ↩︎
-
Whether this will be across the board, only for teams, or maybe only for private repos is something I suspect they’re still trying to figure out. ↩︎
-
Yes, I agree, being limited to a single step is annoying. ↩︎
-
Ok, so not everything is defined in the yaml file, but obviously storing passwords in your repository is not something you should do. ↩︎
-
To me at least, you don’t have to agree with that. ↩︎
