When it comes to creating an infrastructure in AWS, CloudFormation is a great tool. You can use it to manage your entire infrastructure, from the initial setup to any updates and removing it all again.
When you follow the link above you will find a marketing speech explanation of CloudFormation that somehow manages to obscure what it actually is while mentioning all of the key points. I’m not going to say that my explanation will be better for you, but at least it’s short and shows how I think of it.
CloudFormation allows you to manage your AWS infrastructure by defining it in code.
I’ll be writing several articles about CloudFormation, progressing to more and more interesting setups. This article will start with the basics; explaining how CloudFormation works and walking through setting up a simple infrastructure containing a couple of load balanced EC2 instances in their own VPC.
Terminology
As we’ll be talking about CloudFormation a lot, let’s start with defining a couple of terms. This is not an exhaustive list, but these are the most important ones you should be familiar with.
Template
A template is the JSON file that describes your setup. It can be big or small, and has to adhere to the AWSTemplateFormat you define. You define this for the initial setup, and then you can make changes to it for further updates.
{
   "AWSTemplateFormatVersion" : "2010-09-09",
   "Description" : "An example template",
Note that the order in which you define items in your template doesn’t matter, so you can organise it any way you prefer. The AWS documentation has a section devoted to the template anatomy, which goes into far more detail.
Stack
A stack is the implementation of your template. When you upload your stack to AWS it will turn that into the infrastructure you requested. This can range from a single EC2 instance to a complex system of hundreds of instances and using almost every AWS service.
Resource
Resources are the various services you define in your template. This can be anything from an EC2 instance to a SQS queue, and for each resource you define a number of properties. You can find a complete list of resources and their properties in the AWS Resource Types reference.
   "Resources" : {
      "IPAddress" : {
         "Type" : "AWS::EC2::EIP",
         "Properties" : {
            "InstanceId" : {
               "Ref" : "Webserver"
            },
            "Domain" : "vpc"
         }
      },
Parameter
A parameter is a value that can be provided when you upload your template. You can set default values so you don’t always have to provide them, but these are the only values you can override when you create or update your stack. The most common usage of a parameter is probably defining the instance type of an EC2 instance.
   "Parameters" : {
      "InstanceType" : {
         "Type" : "String",
         "Default" : "t2.micro",
         "Description" : "Type of EC2 instance to launch"
      },
How do you use this?
We’ve now discussed the terminology and (briefly) the idea behind CloudFormation, but what we’re still missing is an explanation of how to use it. I’ve explained in my introduction to the AWS CLI that I prefer to work using the AWS CLI tools, so I will explain the usage in those terms.
Build the template
The first step is to create the CloudFormation template. This is most of the work, and is the main subject of the remainder of this article as well as a number of future articles. For now we’ll skip this though and move on to the next step in the process.
Validate the template
Next up you will want to make sure that your template is valid, without running the risk of breaking a setup you already have. You can do so using the CLI validation, just take into account that this will only check for actual errors in the template. Which means it doesn’t validate against anything referred that is not present in the template.
aws cloudformation validate-template --template-body file://cfn1-babysteps.json
Deploy the template
Once the template is valid, you can then deploy it. As a sidenote, while I show all these commands with the --template-body parameter for a local file, it is possible to use --template-url instead if you store your template on S3.
aws cloudformation create-stack --stack-name babysteps --template-body file://cfn1-babysteps.json --profile demo
If you want or need to fill in parameters you can do that with the --parameters option leading to command such as this.
aws cloudformation create-stack --stack-name babysteps --template-body file://cfn1-babysteps.json --parameters ParameterKey=InstanceType,ParameterValue=t2.small --profile demo
Waiting time
From this point on, you’ll have to wait for the creation of the CloudFormation stack. You can check the status with any combination of the below commands, but for a simple setup like this you can just watch it happen in the Console.

aws cloudformation list-stacks --profile demo
aws cloudformation describe-stack-events --stack-name babysteps --profile demo
aws cloudformation describe-stacks --stack-name babysteps --profile demo
For big stacks these options aren’t all that useful as you’d just like to get an update once it’s finished. That goes beyond the basics though, so I’ll describe that in a future article.
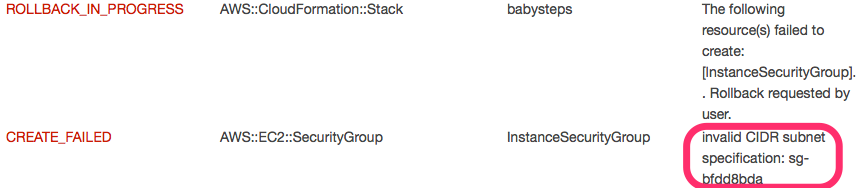
Despite all your preparations however, it is always possible that there is a mistake in your template and the deployment will fail. When that happens, check the events to see what happened. In the below image I said I was going to provide a CIDR block while what I actually provided was a security group id. This passed validation because it was provided as a reference, but obviously I made a mistake here.
Updating and deleting
The most common task you do with CloudFormation is probably updating your stack. This has the exact same syntax as the create command, only using update-stack instead of create-stack.
aws cloudformation update-stack --stack-name babysteps --template-body file://cfn1-babysteps.json --profile demo
Another task you will carry out frequently if you follow along with my examples is deleting stacks. Use this with care! It will not ask you for confirmation when deleting a stack, so make absolutely certain you’re deleting the right one. For this same reason I would recommend that any default profile you have configured for your CLI tools is not your production environment.
aws cloudformation delete-stack --stack-name babysteps --profile demo
DSL
As you can see in the earlier snippets, there is a fair bit of writing involved in setting up a template. That in itself isn’t a major problem, but what is a bit annoying about the basic CloudFormation template is that it can quickly become unmanageable. One major issue is that you can’t have any comments in the JSON code, which makes it a lot harder to manage than it needs to be.
Luckily, there are a number of people who have written a DSL (Domain Specific Language) for creating these files. This means that you write the CloudFormation template in a different language that you then parse into the JSON file CloudFormation understands.
There are a number of DSLs out there, which you can find by searching, but the one that I use is cfndsl. I chose to use this one mainly because it was mentioned in the “So you think you’re an AWS ninja” presentation at the AWS Summit in Sydney. It’s certainly possible better DSLs exist, and don’t hesitate to let me know about that, but I’m familiar with cfndsl so I’ll use it here.
I’m not going to explain how the DSL works as its README file does a good enough job of that. However, I’ll give a brief example of what the above examples look like using the DSL.
  Parameter("InstanceType") {
    Description "Type of EC2 instance to launch"
    Type "String"
    Default "t2.micro"
  }

  # The Elastic IP for the Webserver
  Resource("IPAddress") {
    Type "AWS::EC2::EIP"
    Property("Domain", "vpc")
    Property("InstanceId", Ref("Webserver"))
  }
To be fair, this doesn’t look all that different, but you can already see that the syntax is easier to read and that comments can improve on this even more.
Because it is more readable and concise, I will use the DSL code for the examples in my articles, but the templates will also be available in full on Github. As both DSL and compiled JSON file.
Gotcha’s
Despite what we’d all want, CloudFormation isn’t perfect and has its pitfalls. There have been plenty of times where I wasted time because I didn’t pay enough attention to the documentation. For that reason I’ll once again link to the AWS Resource Types reference and remind you that reading the details is important.
Another thing to remember is to make sure you validate your template before you update. If an update fails, CloudFormation will try to roll back the changes but if the problem is big enough this might not always succeed and your stack could end up in a state of UPDATE_ROLLBACK_FAILED. This state will prevent you from updating your stack in the future and you can’t fix that through either the Console or CLI tools. No, you really don’t want to get in that state.
Building the template
This example is available on Github as both the DSL and JSON file. If you prefer you can download them now, or do so after finishing this article.
In case you aren’t familiar with all the resource types mentioned here, there is a link to the relevant section of the AWS documentation when they come up. I won’t go into detail about each of them here as that would make this article a lot longer. Instead, I will walk through the CloudFormation template step by step, explaining what happens. The comments in the DSL file serve the same purpose, but to keep things more concise I’ve removed those from the below snippets.
First we initiate the template, by providing the necessary template version and description.
CloudFormation {
  AWSTemplateFormatVersion "2010-09-09"

  Description "Babysteps example consisting of 2 EC2 instances behind an ELB"
Next up are some variables we will use later in the template. A name we can use to identify the template, and the number of EC2 instances we wish to spin up.
  templateName = "Babysteps"

  numberOfInstances = 2
Now we’ve passed the preparations and we’ve reached more interesting things with the Parameters. I’ve explained what these are above, so I’ll limit myself here to just mentioning the ones we’ve got. First is the InstanceType for the EC2 instances, followed by the EC2 key pair for accessing the EC2 instances through SSH. You will have to ensure this key is registered in AWS first, which is easiest done in the Console.
The last parameter is for determining which IP addresses can SSH into your server. I’ve explained my reasoning for having this limited to the template’s VPC in my article about Securing SSH access with Cloudformation.
  Parameter("InstanceType") {
    Description "Type of EC2 instance to launch"
    Type "String"
    Default "t2.micro"
  }

  Parameter("KeyName") {
    Description "Name of an existing EC2 key pair to enable SSH access to the new EC2 instance"
    Type "String"
    Default "blogdemo"
  }

  Parameter("SshIp") {
    Description "IP address that should have direct access through SSH"
    Type "String"
    Default "10.42.0.0/24"
  }
I haven’t explained mappings yet, but they are a way within CloudFormation to refer to different values. The first mapping is a standard one where you can use the region to find the correct AMI. The second one is mostly for me to keep things clear in my mind, but this same effect could be achieved with variables.
A better solution for this would be to make it similar to the region setup and define these values by region. However, I like having an overview such as this and especially when the number of Subnets grows.
  Mapping("AWSRegionArch2AMI", {
            "us-east-1" => { "AMI" => "ami-864d84ee" }
  })

  Mapping("SubnetConfig", {
      "VPC"     => { "CIDR" => "10.42.0.0/16" },
      "Public"  => { "CIDR" => "10.42.0.0/24" }
  })
Now we’ll start creating resources and, as we need to put everything in there, the VPC and Subnet will come first. Using CloudFormation’s Fn::FindInMap functionality we get the values from the mapping above for the configuration.
You will also notice the first references to other resources here using Ref. This is the only way to refer to other resources in the same template, so it’s nice that AWS made it easy.
Following the creation of the VPC and Subnet we need to ensure these have proper access to the Internet, which is what all the routing and gateway resources are for.
  Resource("BabyVPC") {
    Type "AWS::EC2::VPC"
    Property("CidrBlock", FnFindInMap("SubnetConfig", "VPC", "CIDR"))
  }

  Resource("PublicSubnet") {
    Type "AWS::EC2::Subnet"
    Property("VpcId", Ref("BabyVPC"))
    Property("CidrBlock", FnFindInMap("SubnetConfig", "Public","CIDR"))
  }

  Resource("InternetGateway") {
      Type "AWS::EC2::InternetGateway"
  }

  Resource("AttachGateway") {
       Type "AWS::EC2::VPCGatewayAttachment"
       Property("VpcId", Ref("BabyVPC"))
       Property("InternetGatewayId", Ref("InternetGateway"))
  }

  Resource("PublicRouteTable") {
    Type "AWS::EC2::RouteTable"
    Property("VpcId", Ref("BabyVPC"))
  }

  Resource("PublicRoute") {
    Type "AWS::EC2::Route"
    DependsOn "AttachGateway"
    Property("RouteTableId", Ref("PublicRouteTable"))
    Property("DestinationCidrBlock", "0.0.0.0/0")
    Property("GatewayId", Ref("InternetGateway"))
  }

  Resource("PublicSubnetRouteTableAssociation") {
    Type "AWS::EC2::SubnetRouteTableAssociation"
    Property("SubnetId", Ref("PublicSubnet"))
    Property("RouteTableId", Ref("PublicRouteTable"))
  }
Where the VPC and its requirements were for providing a place to store the resources, we’ll now have the last bit of preparation: the security groups. These security groups are required as they’ll define access rules for the EC2 instances and ELB we’ll set up later.
Again for readability, I define the various rules as Ruby arrays before attaching them to the security groups. The rules defined for the EC2 Instances are to only allow port 80 access from the ELB Security Group and SSH access from the previously defined SshIp parameter. For the ELB we only need world access on port 80.
Once we have these, the actual security group resources only need to refer to the rules and VPC. The only other things we define here are for our own convenience: the description (which is mandatory) and tags (which are not). These are both there to make it easier to find the resources again later.
The Name tag is also recognised by the AWS Console and shown in the Name field there.
  ec2SecurityIngres = Array.new

  ec2SecurityIngres.push({
    "IpProtocol" => "tcp",
    "FromPort" => "80",
    "ToPort" => "80",
    "SourceSecurityGroupId" => Ref("ELBSecurityGroup")
  })

  ec2SecurityIngres.push({
    "IpProtocol" => "tcp",
    "FromPort" => "22",
    "ToPort" => "22",
    "CidrIp" => Ref("SshIp")
  })

  port80Open = [{
                  "IpProtocol" => "tcp",
                  "FromPort" => "80",
                  "ToPort" => "80",
                  "CidrIp" => "0.0.0.0/0"
                }]

  Resource("InstanceSecurityGroup") {
    Type "AWS::EC2::SecurityGroup"
    Property("Tags", [{"Key" => "Name", "Value" => "Babysteps EC2"}])
    Property("VpcId", Ref("BabyVPC"))
    Property("GroupDescription" , templateName + " - EC2 instances: HTTP and SSH access")
    Property("SecurityGroupIngress", ec2SecurityIngres)
  }

  Resource("ELBSecurityGroup") {
    Type "AWS::EC2::SecurityGroup"
    Property("Tags", [{"Key" => "Name", "Value" => "Babysteps ELB"}])
    Property("VpcId", Ref("BabyVPC"))
    Property("GroupDescription" , templateName + " - ELB: HTTP access")
    Property("SecurityGroupIngress", port80Open)
    Property("SecurityGroupEgress", port80Open)
  }

So, we have arrived at the EC2 instances. Much of what you see here has already been discussed earlier. We assign the instance type, image id, keyname, subnet, and security group using the tools we’re now familiar with. There are a couple of things worth noting though. First is of course the general syntax. Instead of defining each instance separately as we would for the JSON setup, we create a loop so we can be sure each instance is the same.
The next thing to note is the babystepsServerRefs array. We’re going to fill this with references to each instance so we can use it when defining the ELB. We also need to assign an Elastic IP to each instance so we can access the servers from our computer.
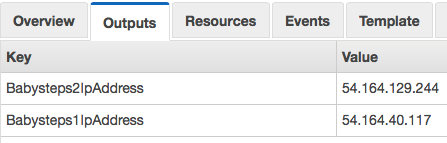
Below that you will see something else we haven’t discussed yet: Outputs. An Output can show additional information when you collect information about the stack. Using, for example, the describe-stacks CLI command. Having the IPs in there means you don’t have to go looking for them. To get the IP Address of the instance we use Fn::GetAtt which can retrieve attributes made available by a resource.
You might have noticed I skipped a part in the instance resources themselves. The UserData property is provided to an instance only upon creation. You can use this to configure an instance when it’s first booted up, but only at that time. As it’s not the main focus of this example, the only thing we do here is install Apache so we can be sure the ELB will treat our instances as healthy. Just keep in mind that this is a powerful tool that you can use for any type of configuration management.
  babystepsServerRefs = Array.new

  (1..numberOfInstances).each do |instanceNumber|
    instanceName = "Babysteps#{instanceNumber}"
    Resource(instanceName) {
      Type "AWS::EC2::Instance"
      Property("SubnetId", Ref("PublicSubnet"))
      Property("Tags", [{"Key" => "Name", "Value" => "#{templateName}-#{instanceNumber}"}])
      Property("ImageId",
                FnFindInMap( "AWSRegionArch2AMI", Ref("AWS::Region"),"AMI"))
      Property("InstanceType", Ref("InstanceType"))
      Property("KeyName", Ref("KeyName"))
      Property("SecurityGroupIds", [Ref("InstanceSecurityGroup")])
      Property("UserData", {
                          "Fn::Base64" =>
                            FnJoin("\n",[
                              "#!/bin/bash",
                              "apt-get install -y apache2"
                              ]
                          )})
    }

    Resource ("BabyIP#{instanceNumber}") {
      Type "AWS::EC2::EIP";
      Property("Domain", "vpc")
      Property("InstanceId", Ref(instanceName))
    }

    babystepsServerRefs.push(Ref(instanceName))

    Output("#{instanceName}IpAddress") {
      Value FnGetAtt(instanceName, "PublicIp")
    }
  end
With the Elastic LoadBalancer we have reached the last part of this example. Once again we go through the motions of connecting to the various resources we have defined earlier, including using the babystepsServerRefs array. Other than that we set up the listeners (limited to port 80 as we have no other ports open) and define the health check.
  Resource("BabystepsLoadBalancer") {
    Type "AWS::ElasticLoadBalancing::LoadBalancer"
    Property("Subnets", [Ref("PublicSubnet")])
    Property("SecurityGroups", [Ref("ELBSecurityGroup")])
    Property("Listeners" , [{
                                "LoadBalancerPort" => "80",
                                "InstancePort" => "80",
                                "Protocol" => "HTTP"
                              }])
    Property("HealthCheck" , {
                "Target" => "HTTP:80/index.html",
                "HealthyThreshold" => "3",
                "UnhealthyThreshold" => "5",
                "Interval" => "30",
                "Timeout" => "5"
              })
    Property("Instances", babystepsServerRefs)
  }
Conclusion
So, we’ve come to the end of this introduction. It was a bit longer than I expected, but I don’t think it would be as useful if I left out the example. Hopefully you learned something from this, and you can use it for your own projects.
When looking at the snippets above you might come to believe that CloudFormation is rather verbose, which is true, but you should also remember that you’re setting up an entire infrastructure. In the past you would have set up physical servers, you can now achieve the same result by writing a single template.
Using the above example, it would be easy to update this to provide an extra server or to upgrade the specs of these servers. And if you have your template in version control you will later be able to find out when and why you made this change. To me that combination of ease of control and sheer power is why I like CloudFormation.
In future articles I plan to show more extensive examples; going past the basics while building more interesting infrastructures. If there is anything in particular you would like to see, let me know and I will see what I can do. In the meantime though, play around with it a bit yourself.
Read more like this:
- Automating a CloudFormation deployment visualisation dashboard
- Building on the SSO APIs
- Fixing AWS SSO's CloudFormation
- CloudFormation Macros: Transform Your Templates
- Building and Testing CloudFormation Macros
Or always get the latest by subscribing through RSS, Twitter, or email!