Generative AI has changed the way we develop applications. Even if you haven’t embraced the hype yet, you can’t avoid reading mentions of it, and this post is no different. The biggest challenge for AI-generated code is to get consistent, good-quality output with the least amount of effort. After all, what’s the point of generating code if you then spend more time debugging it? This post explains how I try to achieve this goal.
Ever since I was introduced to spec-driven development in Kiro, I’ve seen it as an excellent candidate for managing the quality of generated code. The idea of having documentation and a detailed design as the guiding light of your development isn’t new, and when done well, it tends to deliver good results. There are no perfect solutions (yet?), so all we can do is try to improve how we work day by day.
I believe I’ve put my own spin on the general way spec-driven development works, so it’s a good time to share my current workflow. Even if it just serves as a historical record for myself.1 I’ve mostly switched to using Claude Code, so some of the details mentioned will be specific to that, but most parts of this workflow can be used by any tool2.
The pattern
Spec-driven development is a well-known pattern, but please allow me to give a brief recap of what it means, so that I can then go into the details of what we actually want to achieve with it.
First, there is the idea. The thing we want to do, this will start out as a rough idea and maybe we’ll do some iterations around what exactly we want it to look like, what it means, etc. But then we start collecting our requirements. This is an exhaustive list of all the things we want to achieve. This should include our technical requirements as well as any functional, and possibly business requirements.
After we’ve got our requirements, it’s time to design what we want to build. This is where we’ll go into the nitty-gritty of how we want to achieve things. What should the UI look like (if there is one), how should the code work, where does this fit inside the existing project, etc. And then when the design is finished, we can work on creating the tasks that need to be completed.
Last, of course, is the actual execution of these tasks.
During the course of all of this, you will need to make decisions. These can be big decisions or small ones, but keeping track of these is what a decision log is for.
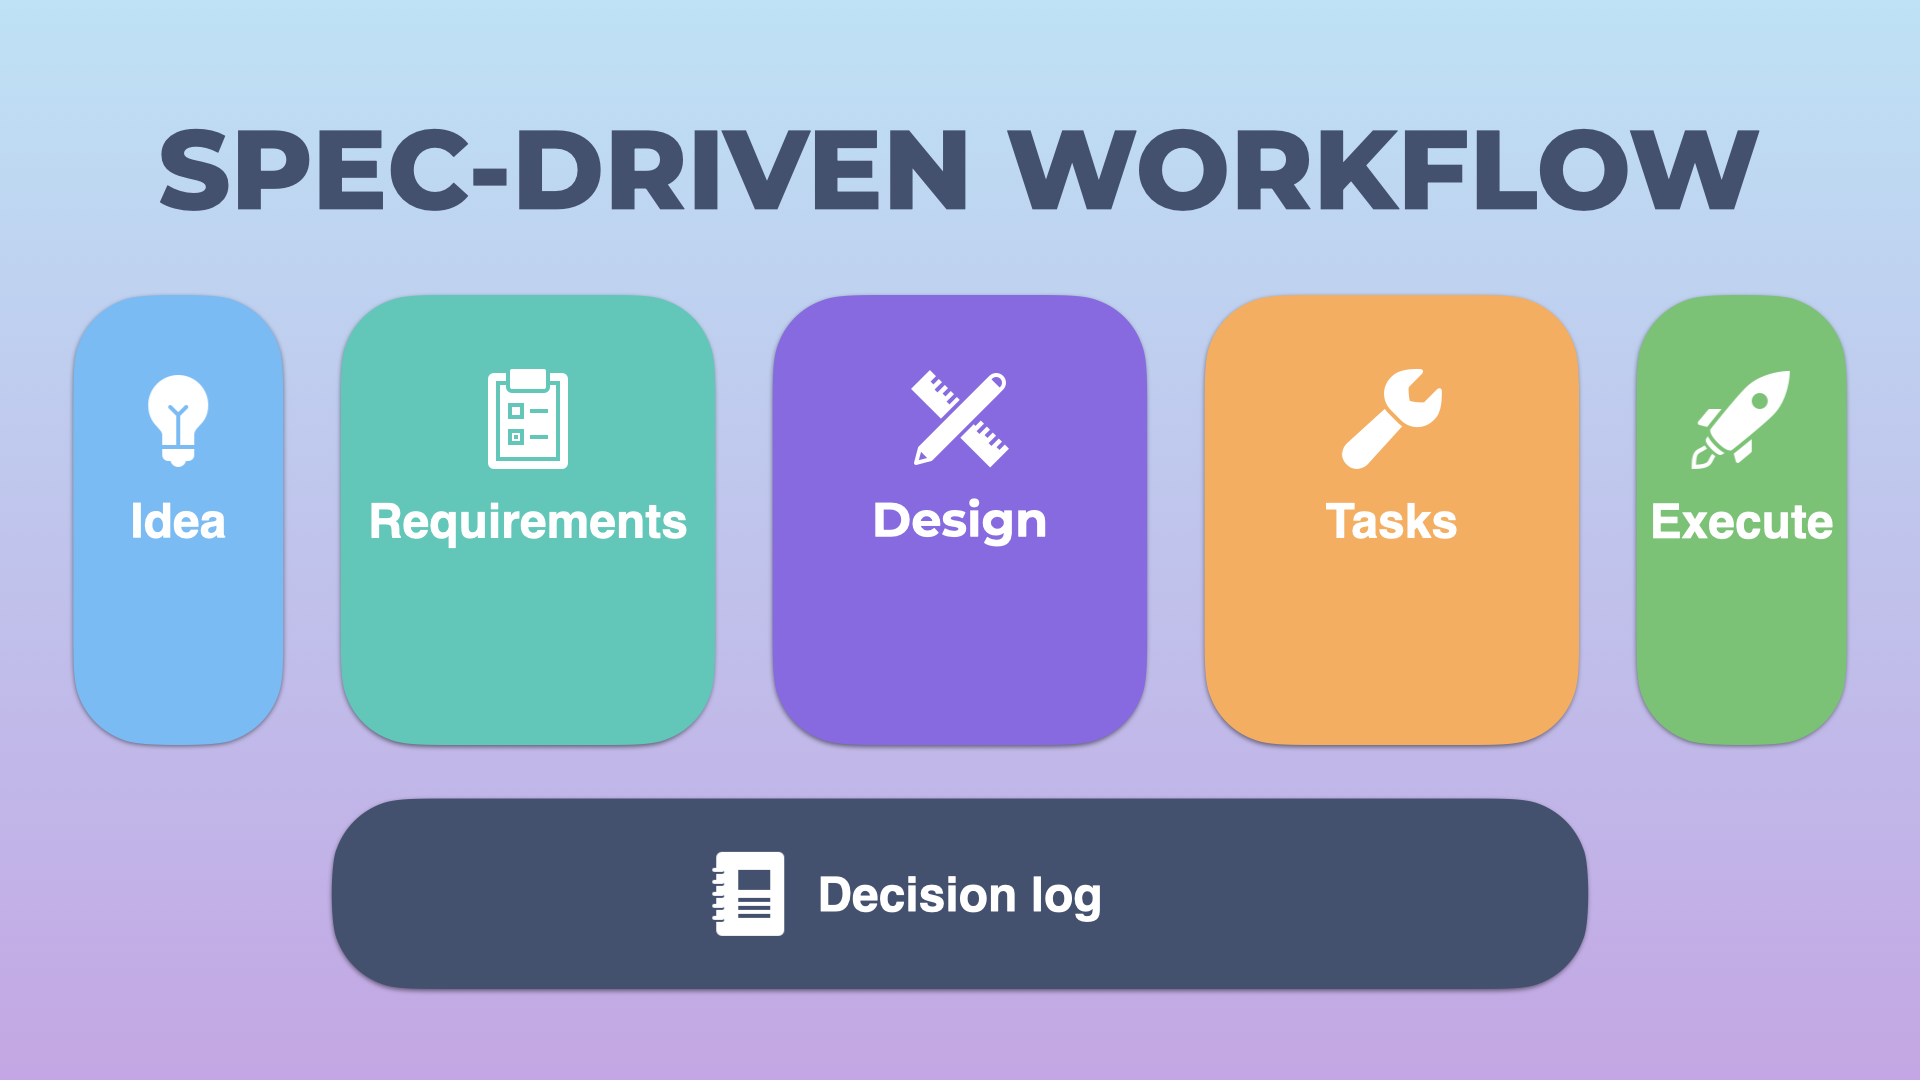
Overview of the spec-driven workflow – five stages plus a decision log.
The interesting bit here is how this has changed with the use of agentic programming tools. It used to be that the execution phase was the longest, but that is no longer necessarily the case. At least not in terms of input from me. The best-case scenario is that I spend between 60 and 80 per cent of the time in the requirements, design, and task phases. The bulk of the remaining time is spent reviewing the generated code.
So, how do I use this workflow? Below, I’ll go through the steps one by one, but it’s also important to note that in order to keep my context small and prevent it from accumulating conflicting information, I clear the context between every command. Everything should only work based on the input it gets from the previous step, and I commit between every step3 so that I can easily roll back. I’ve noticed that people are often still hesitant about undoing changes from an agent; don’t be. You don’t put effort into the code generation itself, so you can easily undo and try again. Or even have multiple branches working on the same spec and picking the one you like most.
A quick note about tools: if you’re not familiar with the Model Context Protocol (or MCP), it’s a protocol used by a lot of tools to make it easy for your agent to interact with. I don’t use a lot of them day to day, but try some of them out regularly. You don’t want to have too many of these running at the same time, because while they’re useful, they can also take up a lot of context. The other tool I use a lot in Claude Code is subagents. Subagents allow you to run specialised tasks in a separate context window and can run in parallel. If you haven’t tried them before, I highly recommend doing so, and I’ll show how I use some of the ones I’ve built.
The idea
The idea is straightforward. I have an idea of what I want to achieve, and I will write that down. If it’s something small, I can write it down directly in the prompt for the requirements (more on that below), or I may write it in a file. The idea has likely4 had some thought put into it. That thinking can be done by myself, or by discussing it with an actual person, or even an AI chatbot like ChatGPT or Claude (both have their strengths, and I tend to use either or both depending on the context).
Requirements
Requirements gathering time! Obviously, this is where we nail down what we want. I’ve created a custom slash command in Claude Code that is named requirements. That link points to the latest version I’ve pushed to GitHub, so you can read it there, but let’s go over some of the main things in there.
As you’ve read above, there are usually two ways in which I start this in a session:
- By writing out my idea
/requirements I want to do this thing
- Or by pointing it at the idea file
/requirements We'll be working on feature awesome-feature-name. Read the idea file and carry out your instructions.
You can see that I provide the feature name in the second example, while in the first one, Claude will propose one. Either way, the name of the spec is the name of the folder it will live in: specs/awesome-feature-name. To match this, I create a branch with the same name5 and the following steps will all be able to determine the spec name based on the branch.
Anyway, at this point the fun starts. While having AI write the requirements is a good start, the quality of a first run isn’t necessarily the best6 and no plan survives contact with the enemy peer reviewer. So, after generating the requirements document, my command will do three things:
- Show me the questions it still has that should be answered for the best result.
- Ask my design critic subagent for its opinion on the requirements.
- And ask the peer reviewer subagent to provide input as well.
The peer reviewer subagent is the most fun bit, as it does what might be considered slightly overkill. Using Sam McLeod’s devtools MCP, it will ask both the Gemini CLI and the Amazon Q Developer CLI for their opinions. Yes, it calls two different editors/tools that have their own agent running. Gemini CLI obviously uses Gemini 2.5 Pro under the hood, and while Q Developer’s Claude 4 Sonnet is not too different from the Claude 4 Opus that I have running in Claude Code, the settings and different system prompt still provide a unique perspective.
All of this input is then collated and turned into updates to the requirements document. The fun thing here is that I’ve set things up to be critical enough that it will sometimes suggest not to implement a feature, or change the way I envisioned it. After this, there might be more questions for me or I have additional feedback, and we iterate until I have the exact requirements I want.
# Front Matter References Feature Requirements

## Introduction

This feature adds the ability to add front matter content through CLI commands in the rune tool. Currently, users cannot add front matter using the command-line interface, requiring manual markdown file editing to establish metadata, references, and other YAML properties.

## Requirements

### 1. Add Front Matter via Create Command

**User Story:** As a user, I want to add front matter content when creating new task files, so that I can establish metadata and references from the start without additional steps.

**Acceptance Criteria:**
1.1. The system SHALL extend the create command to accept --reference flags (repeatable) for reference paths
1.2. The system SHALL extend the create command to accept --meta flags in "key:value" format (repeatable) for metadata
1.3. The system SHALL support adding multiple references and metadata entries in a single create command
1.4. The system SHALL create the front matter section at the beginning of the new file
1.5. The system SHALL generate valid YAML front matter format
1.6. The system SHALL add references as YAML array entries under the "references" key
As you can see in the above example (full version), the end result includes a lot of details about what we want to achieve, but doesn’t include how. In addition to this, every single time a decision is made, by me or the model, it will update the decision log so I can see why we went a certain route. This decision log remains important throughout the entire process, including the execution phase, as everything should take it into account.
# Front Matter References Decision Log

## Decision 1: Feature Scope Simplification
**Date:** 2025-09-01
**Decision:** Limit feature to only adding front matter content, not editing or removing
**Rationale:** User feedback indicated the initial scope was overly complicated. Only addition capability is needed since existing commands already display front matter.
**Impact:** Simplified requirements focus on two commands: extending create and adding add-frontmatter
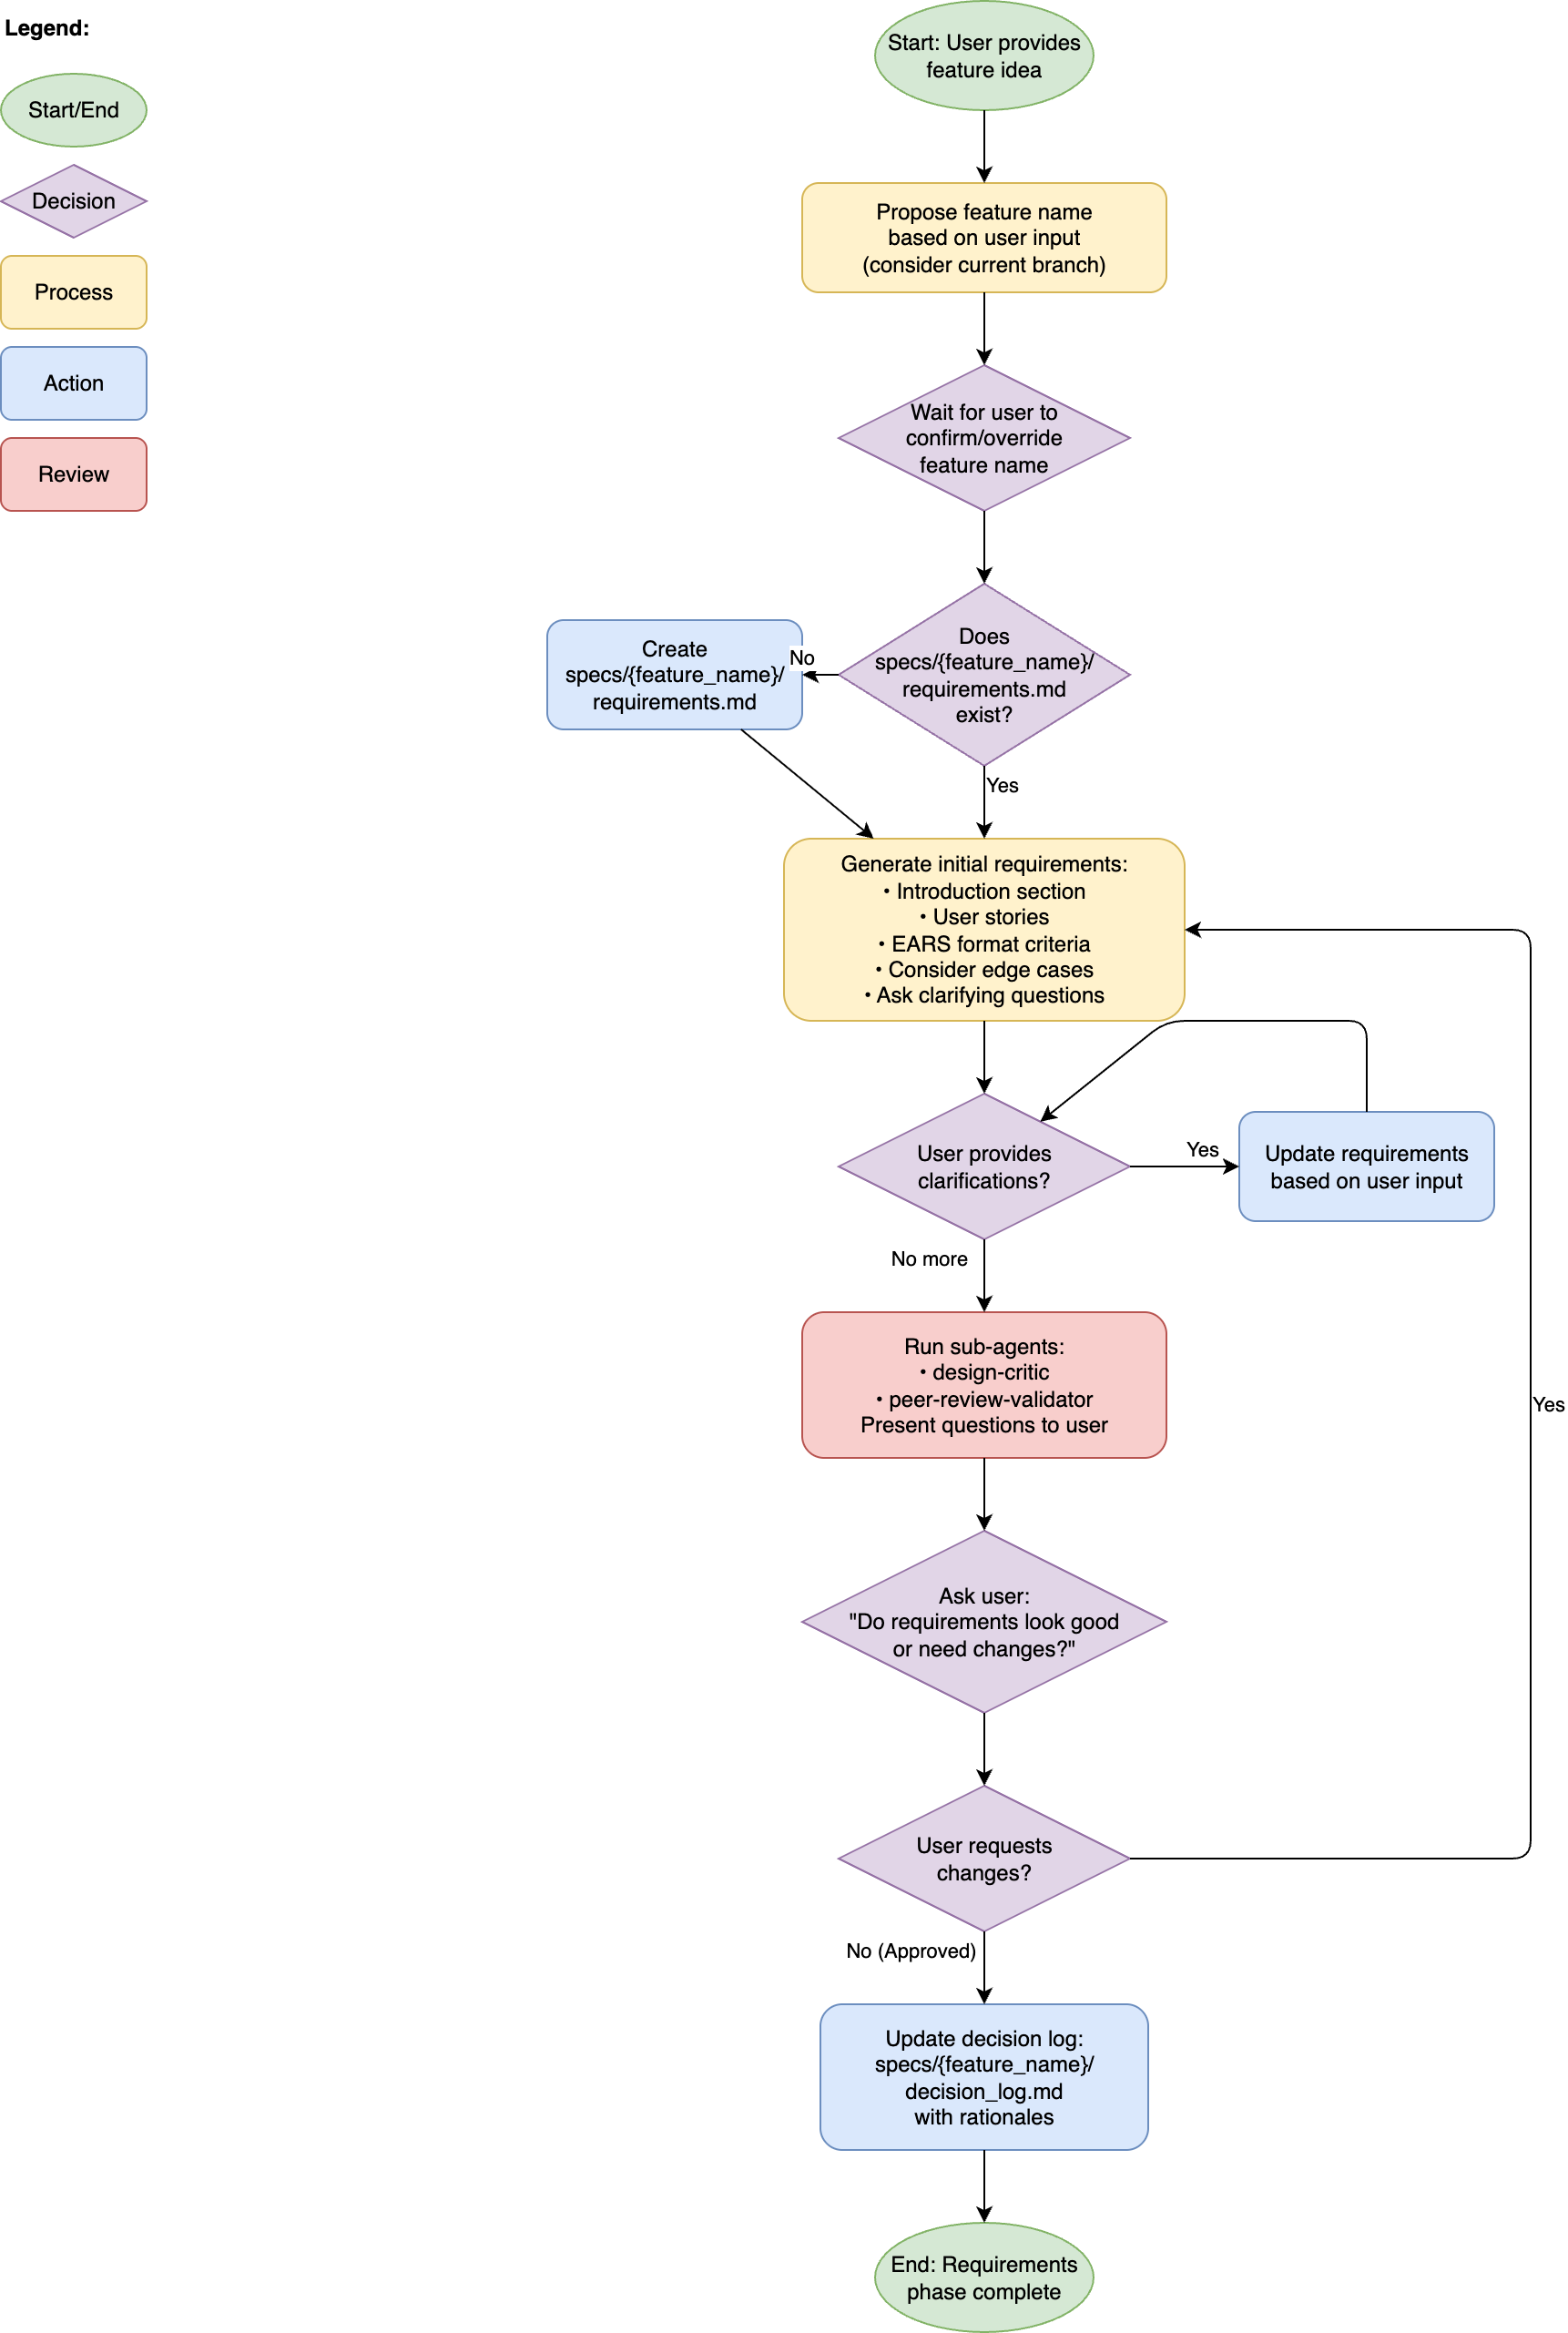
Requirements phase flowchart – from idea to approved requirements (click to expand).
Design
The design phase is very similar in nature. As mentioned before, by this point, I’ll be working from a branch that matches the name of the spec. It will automatically find the correct spec and attempt to read the requirements. And all I have to do is run the workflow without any arguments.
/design
I can of course provide it in the unlikely case I’m working on a differently named branch, I can include the specs/ prefix or leave it off. Usually though, I just make sure I’ve got my branch in order as all the following steps have the same logic.
/design transformation-pipeline
The command then does some validation, and if everything is fine, it will start doing research using the available tools, as well as once again asking the same subagents for their input. This process again often generates questions, and based on exactly what I need I may have a lot of comments and discussion going on here.
In fairness, my input on these items is very much influenced by what I find important. One thing I will often do in this phase is call other subagents manually to review the design, especially my code-simplifier, to limit the amount of overcomplicating that can happen7.
Be aware that the design document is often quite long, and there can be many things in there that may not be relevant to the design you’re working on. For example, when I was building the tasks management tool I’ll describe in the next section, it tried to add lots of benchmarking, speed optimisations, and security validations, while I just wanted something that could easily parse a Markdown file that contains maybe 50 tasks.
# Front Matter References Feature Design

## Overview

This feature extends the rune CLI with the ability to add YAML front matter content through command-line operations. The design focuses on two primary command enhancements: extending the `create` command to accept front matter during file creation, and adding a new `add-frontmatter` command for modifying existing files.

The implementation leverages and extends the existing front matter infrastructure in the codebase, which already handles parsing and rendering YAML front matter through the `FrontMatter` struct and the `ParseFrontMatter`/`SerializeWithFrontMatter` functions in the `internal/task` package.

## Architecture

### System Context
The design starts with a high-level overview, but quickly goes into the exact details on how something needs to be implemented. This includes showing parts of the code that can then later be used during the execution phase.

Design phase flowchart – from requirements to approved design (click to expand).
Tasks
With the design complete, we simply need to break down the actual work into tasks. One thing I’ve found is that when you give an LLM a file full of tasks, you REALLY have to force it to not go beyond what you want. Because of this, I’ve written a small tool called rune that creates the tasks file exactly the way I want it, and lets me retrieve tasks one at a time in the execution phase without the agent seeing the whole file8. For this phase, the first part of this is the important bit.
/tasks
Yes, it works like the design one in that it automatically does all the validations, finds the correct info based on the branch, etc. After that, it generates the tasks and this is probably the biggest part that is ripped off from Kiro. As I said, the tasks get put into a tasks.md file and I add a bit of metadata to that. Specifically, the command adds links to the requirements, design, and decision log files of the spec as references. If there is any other information relevant to all tasks, I will add it manually as well. An example of that might be an API reference for a library.
Some items I demand of the tasks:
- They have to be executable by an agent.
- It must be test-driven, with unit tests coming first.9
- Don’t go more fine-grained than 2 levels with subtasks, 1.1 is fine, 1.1.1 is overkill
- Some other things to hopefully make the result better.
---
references:
    - specs/batch-operations-simplification/requirements.md
    - specs/batch-operations-simplification/design.md
    - specs/batch-operations-simplification/decision_log.md
---
# Front Matter References Implementation Tasks

- [x] 1. Implement core front matter utilities and merge logic
  - Build foundational functions for parsing and merging front matter
  - [x] 1.1. Write unit tests for ParseMetadataFlags function
    - Test single key:value parsing
    - Test multiple values for same key creating arrays
    - Test invalid format detection
    - Test empty key/value handling
    - References: Requirements 1.2, 2.3
  - [x] 1.2. Implement ParseMetadataFlags function
    - Create function to convert 'key:value' strings to map[string]any
    - Handle multiple values for same key by creating arrays
    - Keep values as strings by default (no type inference)
    - Support colon in values by using first colon as separator
    - References: Requirements 1.2, 2.3
That said, this is the least interactive part of the whole workflow and mostly just works without any input. The example here only had 5 main tasks, but I added another 5 afterwards when I disagreed with the result. Showing that you should still verify the tasks will do exactly what you want them to do.
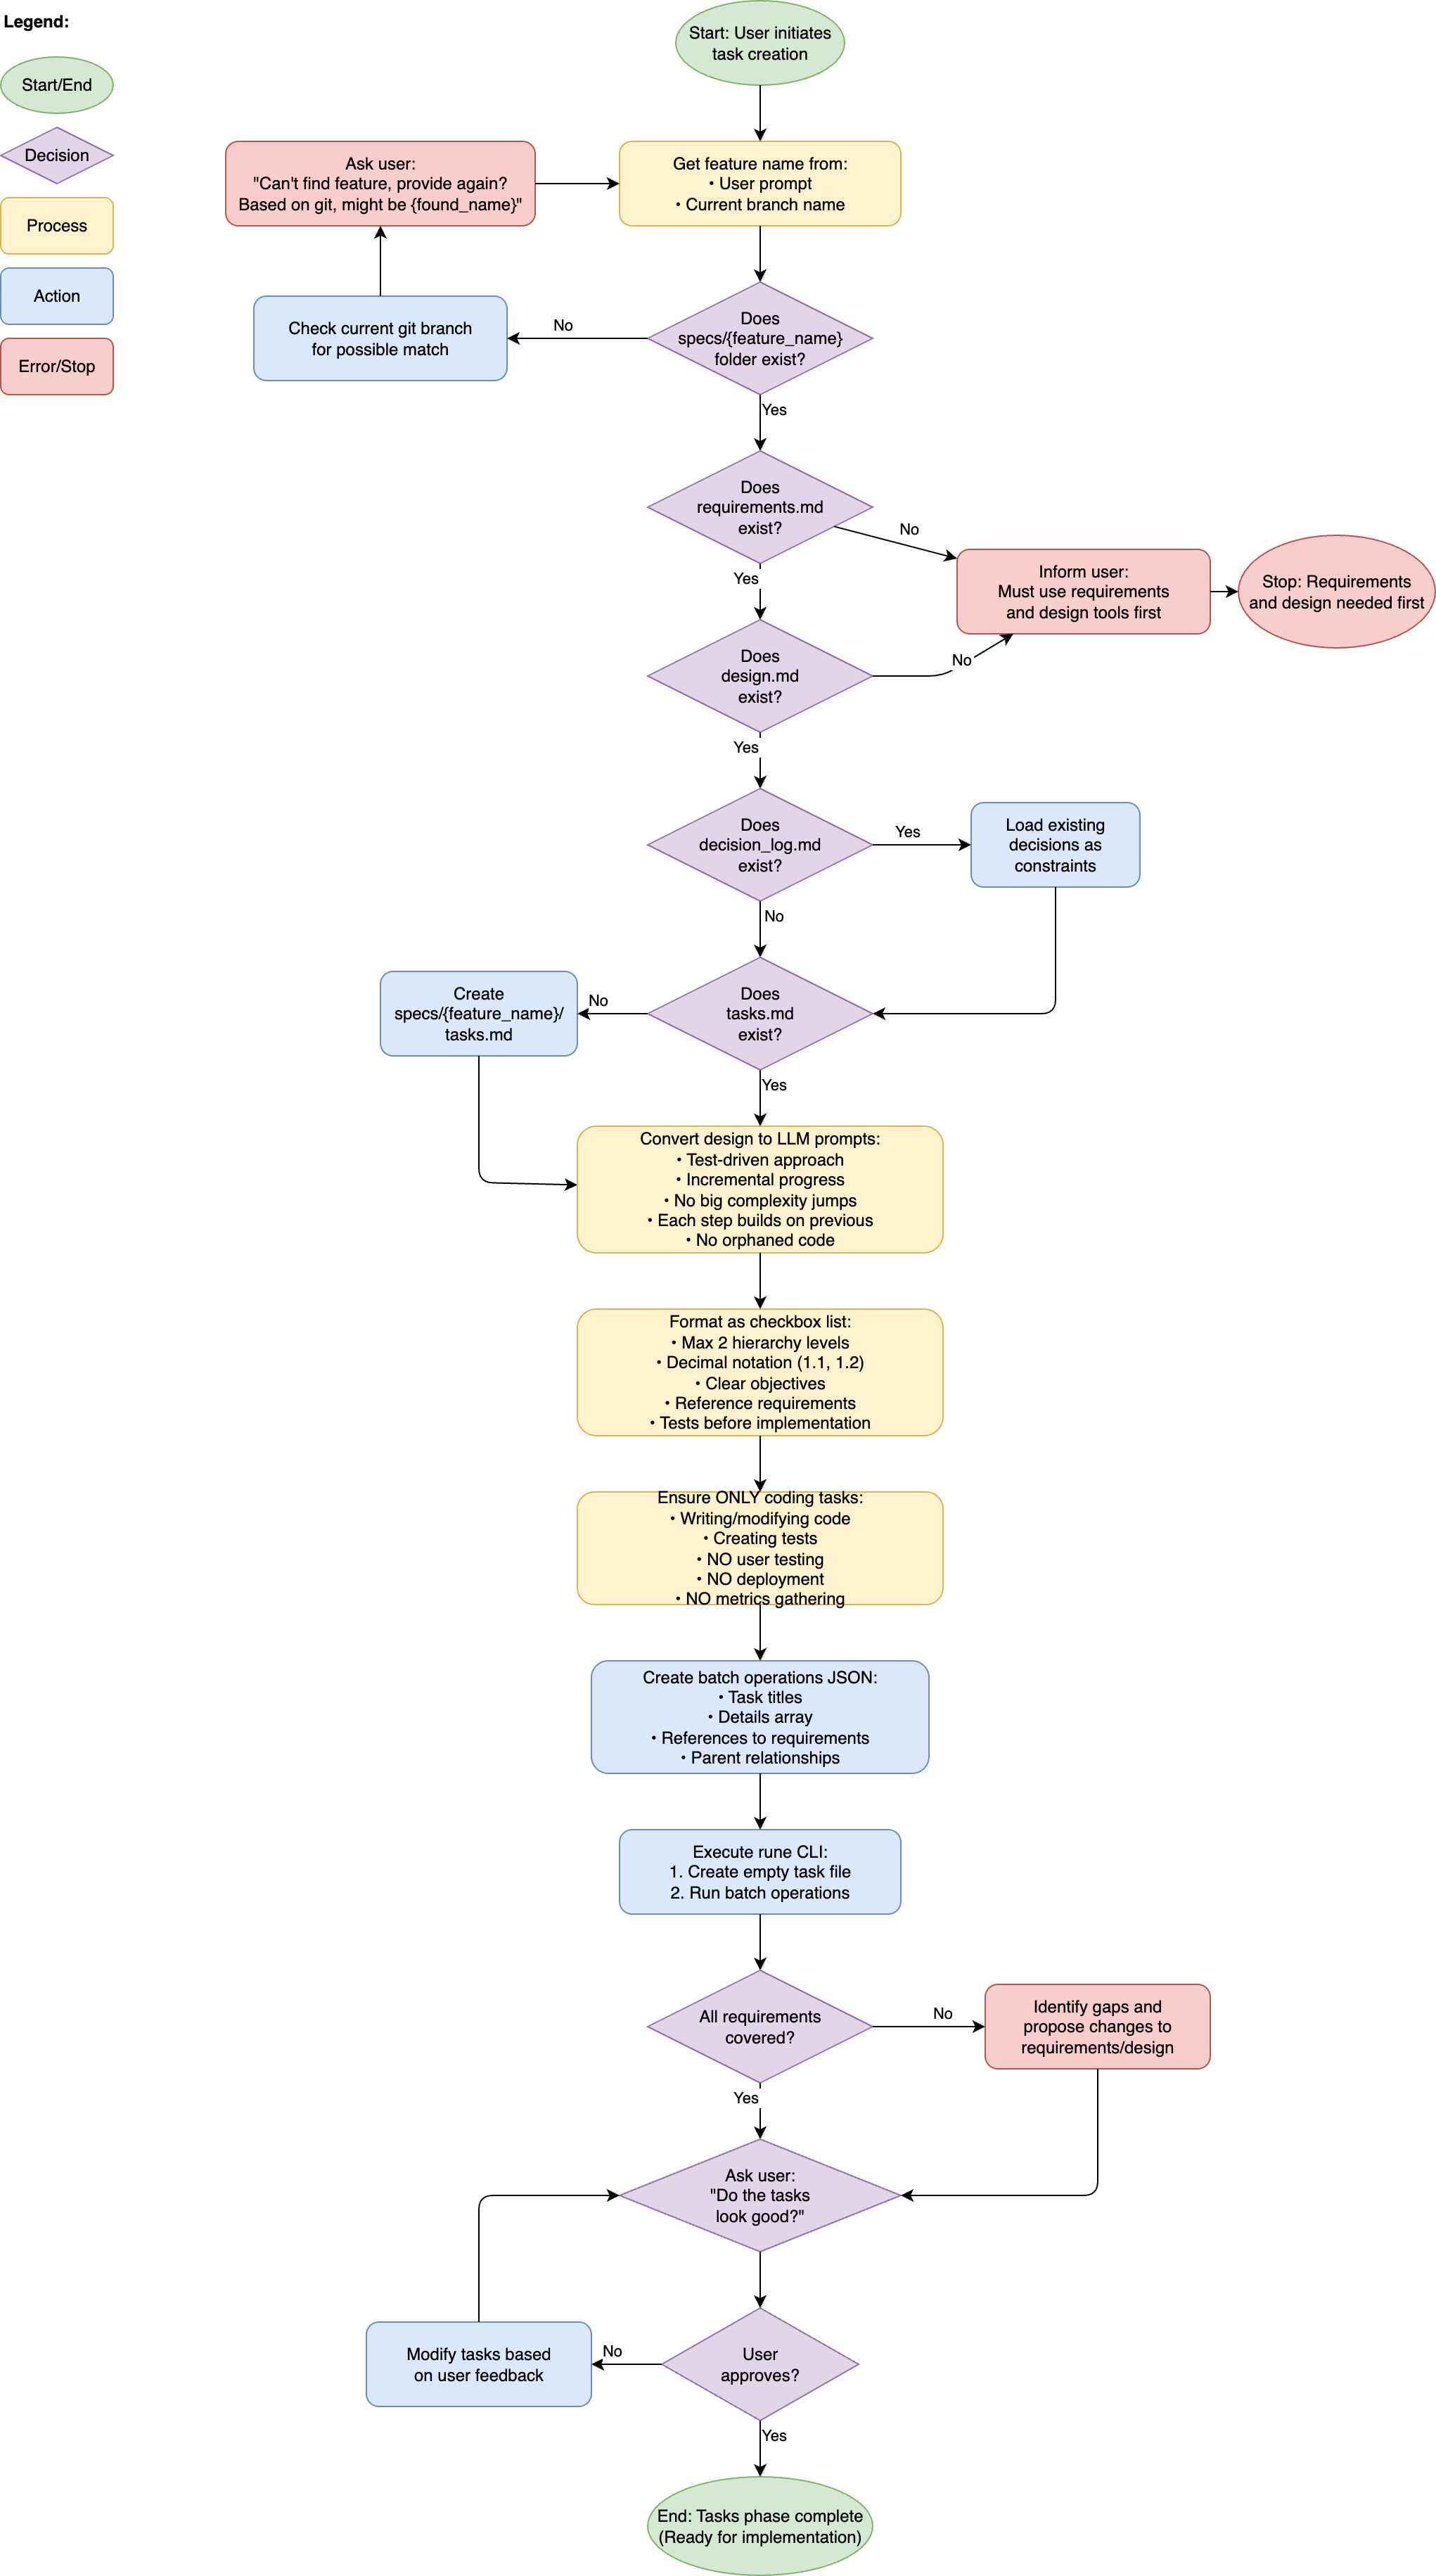
Task creation phase flowchart – from design to approved task list (click to expand).
Execution (aka Next task)
For the execution, I mostly let it do its thing. I will often be doing other things while coming back to review code and type /next-task again.
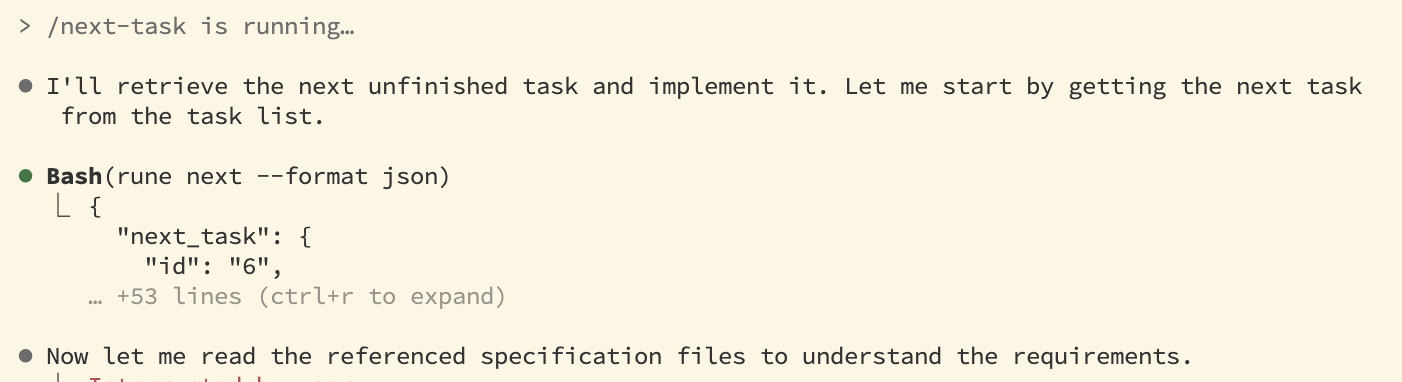
Command-line output when running /next-task.
Introducing the rune tool has made things a lot easier in this step. I no longer need to have a bunch of demanding rules about only implementing a specific task and then seeing that ignored. That doesn’t mean it can’t still go overboard and do more work than needed, but because all interactions with the tasks goes through rune, the model literally doesn’t read the tasks.md file so that risk is lowered10.
After the command is done with the work, I then review it. If the tasks have been created well, there isn’t too much code to review. As everything is unit tested, I tend to focus more on the overall structure of how it was implemented, if I see any weird things, or just disagree with something. I will then ask why something was done, and either tell it to make changes, or I will roll back all changes and make adjustments to the spec before trying again. Unless the code is needlessly complex, I’m usually happy to let it through without any major changes.
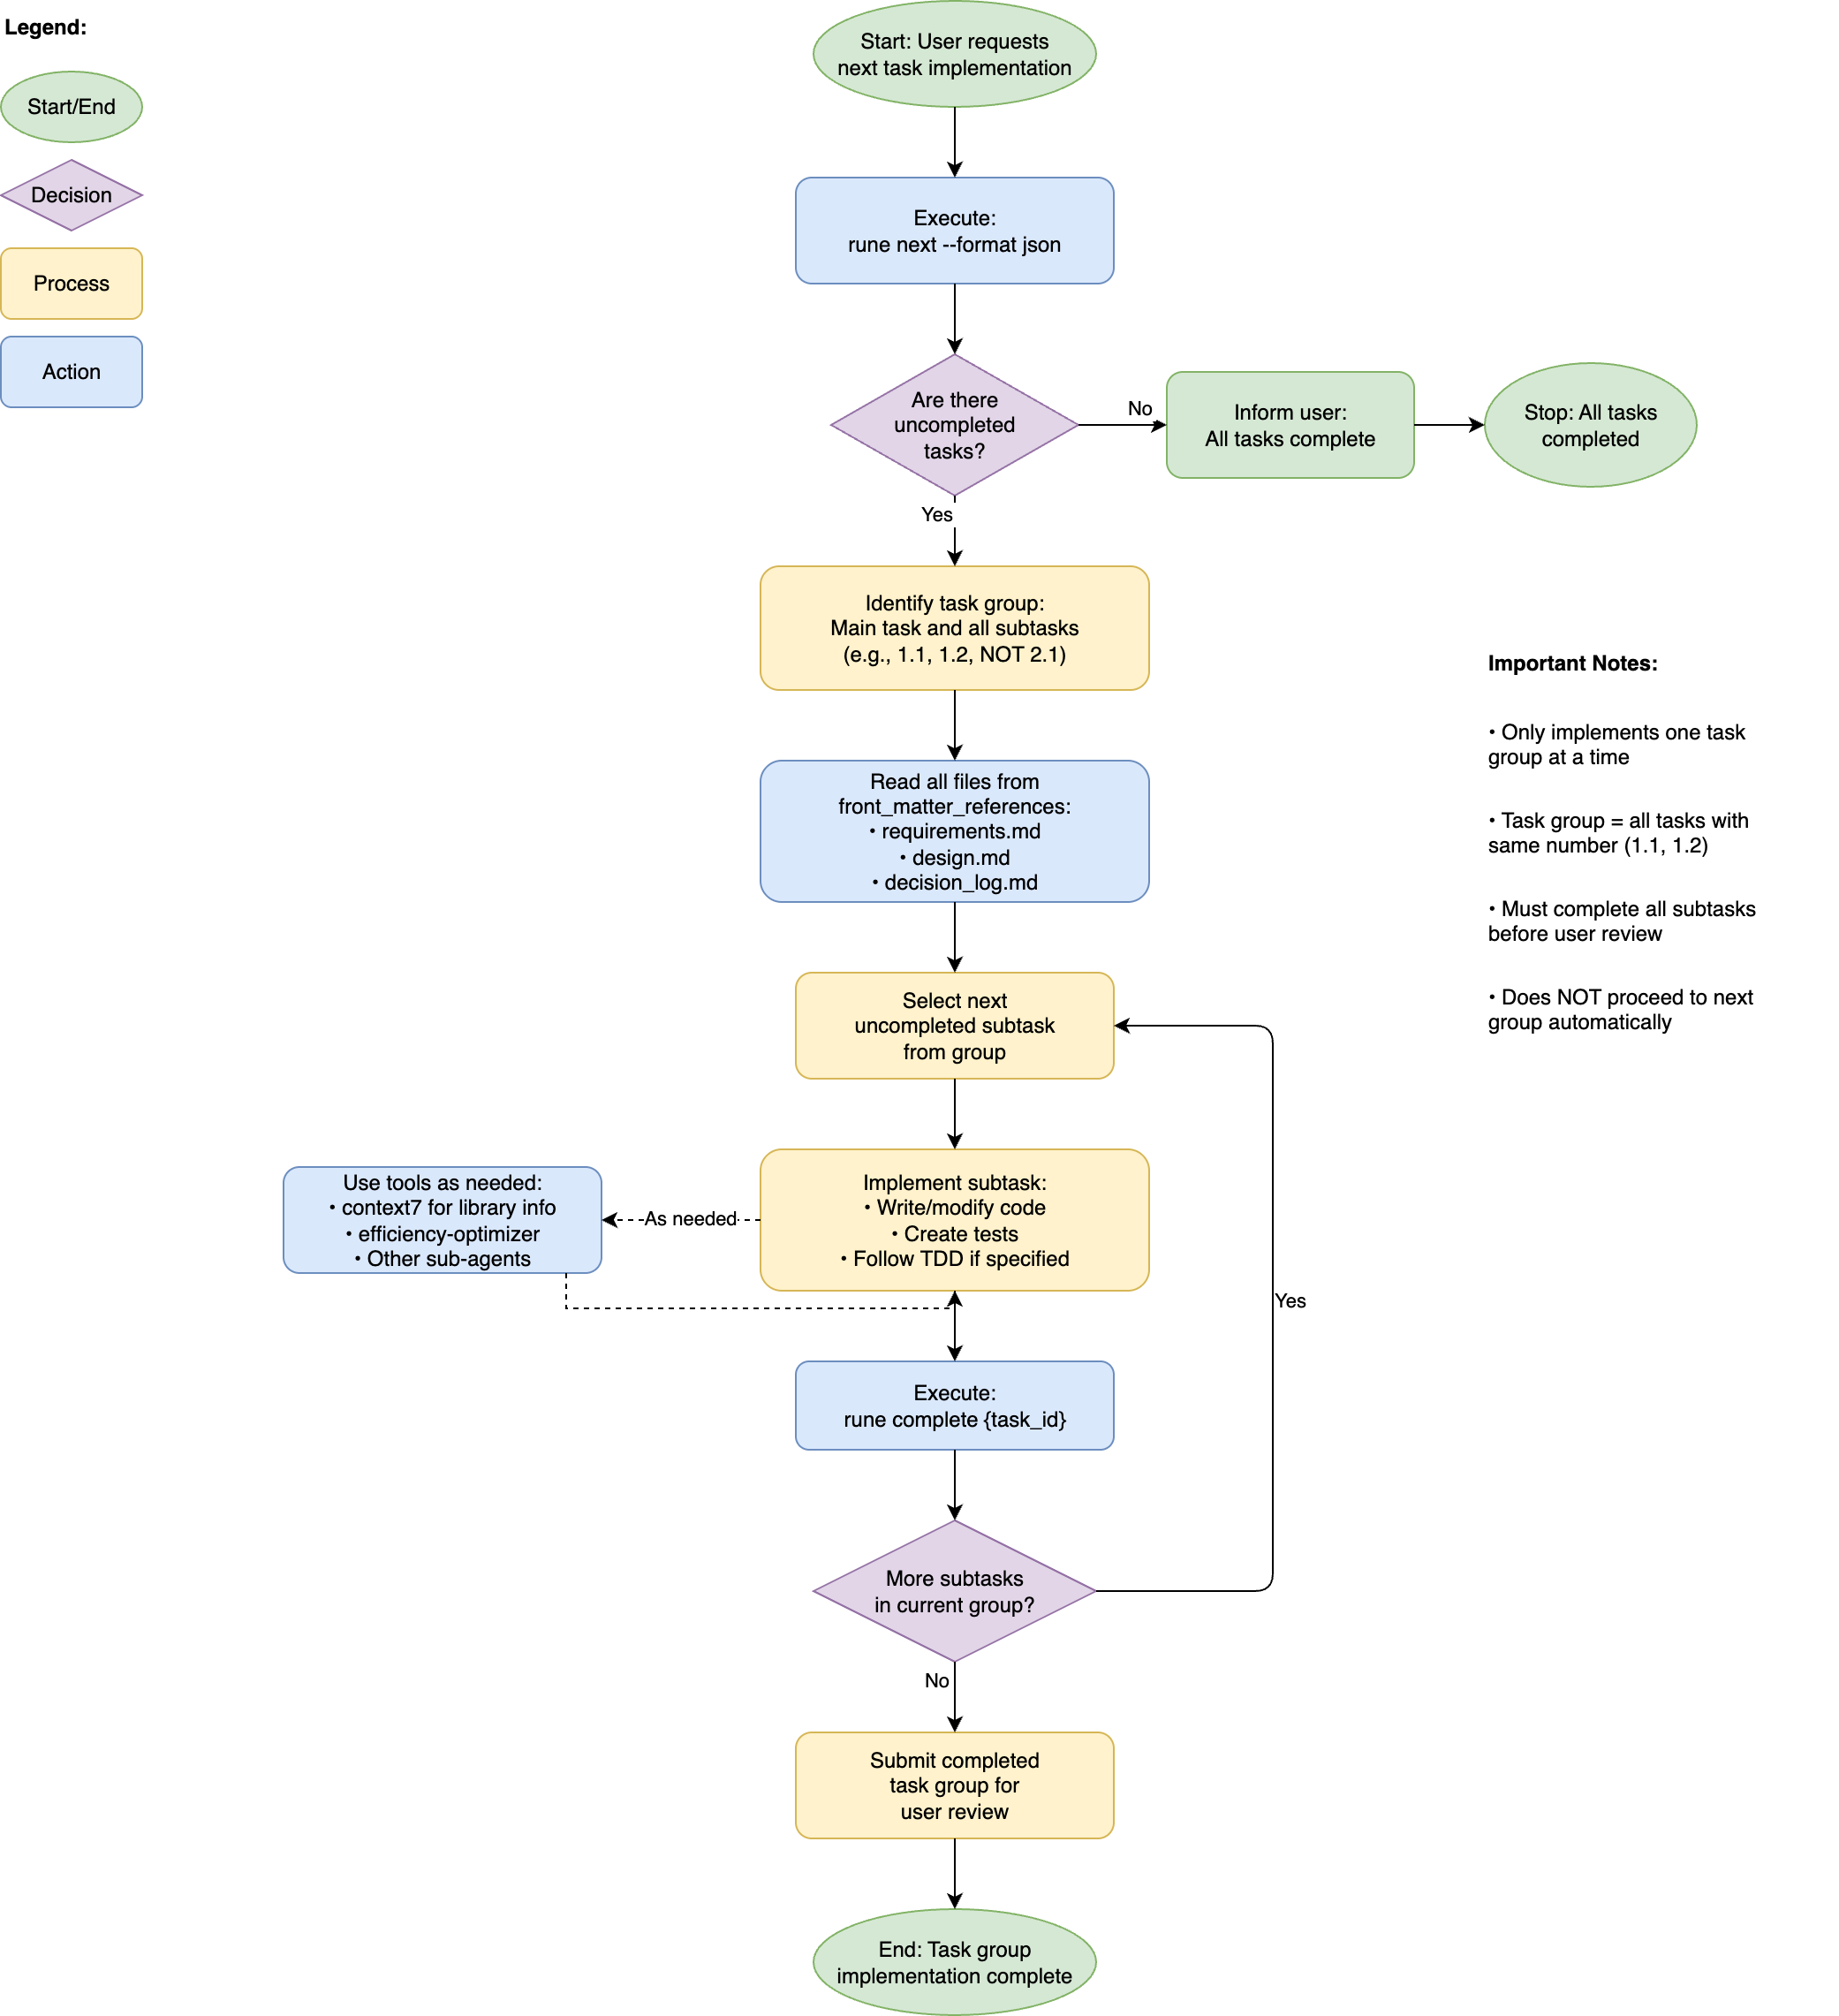
Execution phase flowchart – shows how tasks are processed step by step (click to expand).
Where it falls down
I mentioned earlier that the workflow isn’t perfect. In the end, we’re still working with flawed beings on both sides of the keyboard11, so all we can do is continually try to improve. I’m not going to go over every mistake that’s been made, but some things I’ve run into are:
- The model literally telling me that it’s a stupid idea.
- The model trying to turn everything into an enterprise grade solution when all I really want is a simple script that nobody else will work with.
- Not being detailed enough. I like to compare agents to my kids: you can tell them everything but if you leave even the slightest bit of wiggle room, they’ll jump on it.
In a way, all of these points come down to the writing of the spec in its various stages. If I’m writing something small, I should include that it’s not meant for highly secure use cases. Because in the research phase it will look for the “best” possible way to implement it and the design phase explicitly calls out security. My code simplifier subagent is also a direct response to this, I just can’t let that one be a direct part of the solution as it can be a bit trigger happy on features it doesn’t like.
What’s next
This workflow is constantly evolving, and I’m always trying to tweak the rules for the various commands. And of course, sometimes I make bigger improvements, like the introduction of rune or the decision log. I have many plans, and I’m sure I’ll be writing about them as they get ready.
One thing I want to do is tweak the roles of Gemini and Amazon Q Developer. Especially with Q, I can make it use specific agent modes that I define to get better results, and I haven’t started playing with that yet. It’s actually an interesting way of achieving results and should give me a range of reviewers I can use for various roles.
That said, all of my current workflow can be found in my agentic-coding repo and feel free to make use of that in whatever way works for you. I’d love to hear your input about things that work well or not.
-
And maybe in the future I can point at this post and laugh how wrong I was. ↩︎
-
I also use it with GitHub Copilot for example. ↩︎
-
I have a workflow for the commits as well, which I’m not going through in the post. You can read it here. ↩︎
-
I like to think this is always the case, but it is possible that at times I might be tempted to go “that sounds like fun, let’s build it”. Not often obviously, I doubt it happens more than 2 or 3 times a day. ↩︎
-
When using a similar system for clients, I will of course adjust to the requirements there. ↩︎
-
Yes, I have shelled out for the cheapest Max plan so all the design work uses Opus, but that doesn’t make it perfect. ↩︎
-
A 2400-line bash script is a lesson well learned. Thanks Kiro. ↩︎
-
I’ll have a post in the near future about building rune itself and how it fits in this workflow. ↩︎
-
Don’t worry, like most developers, the model usually finds a way to do the implementation first anyway. ↩︎
-
It still reads the design document, so it knows what needs to be built, but so far it hasn’t actively tried to build anything that it didn’t need for its task. ↩︎
-
I like to think I’m the one who is slightly less flawed, and please don’t disabuse me of that notion. ↩︎