As I’ll be writing a number of articles about AWS in the future, I figured it would be a good idea to first introduce the basics. This article will therefore introduce the AWS API, and guide you through setting it up for your own use.
Background
AWS has two main interfaces: the AWS Console you access through the web browser and the API. While the Console looks a lot nicer and certainly has its uses, I personally prefer using the API wherever possible.
Let me clarify that while there are a large number of AWS tools that run from the command line the one I’m talking about here is the AWS Command Line Interface. This article will not touch on any service specific tool that can be found on the AWS Tools page. I also have no intention of rewriting the entire user guide, so I recommend you read that after this article.
Why use the API?
When you read the above, you are likely to ask why I prefer using the API. A fair enough question, so I’ll briefly try to answer that in a way that might convince you.
The main reason for this is efficiency. While you can do many things with the Console, the API makes it a lot easier to do these things. And not only make them easier, but it will allow you to automate them. Let me give a simple example here:
The images for this article are pushed up to an S3 bucket after I create them, and then I insert a Markdown image tag in my text editor with that URL. While I can upload them through the Console that takes more attention away from writing than I care to. So instead I use a command to push them up from the command line.
aws s3api put-object --bucket assets2.nore.me --key posts/PermissionsIAM.png --body PermissionsIAM.png --profile blogs
I can now use a TextExpander snippet for this so that it will only take me moments to upload an image. And when I decide that the image needs some more refinement I can simply run the command again to have the updated image instantly available.
However, this is just the first step in what’s possible. To improve on this I created a small script that will handle the second step of my process as well.
ignoreimage() {
aws s3api put-object --bucket assets2.nore.me --key posts/$1 --body $1 --profile blogs;
echo "" | pbcopy;
}
This little snippet of code, which is in my zsh config, will do everything I need. It simply takes the first argument and uploads the file with that name to my S3 bucket. After that it will then copy the resulting image url in Markdown format to my clipboard.
Now do you see why I like this so much? It just makes life so much easier and pleasant.
Setting it up
Installing the CLI tools themselves is easy, and the instructions for doing so can be found on the AWS CLI page. Next up is installing auto completion, or command completion as it’s called in the AWS documentation. The official guide for installing this is at the bottom of the Getting Started page in the guide.
An easier alternative if you’re a user of oh my zsh is to enable the
awsplugin in your.zshrcconfig.
Regardless of the installation method, the end result here is that you have excellent tab completion for all commands and sub-commands.
Adding an API user
Next we will need to create an IAM user and its access key to ensure we can use the API. For this you will need to go into the IAM section of your AWS Console. In case you haven’t used this yet, IAM is where all user and access management takes place and you can access it through the services tab.

Q: Why do we create a new user instead of using an existing one? A: Best practice and security. While in a business account it’s easier to give an existing user API access, with a root account having a separate user means you can only give those permissions you need to, or easily disable access when you want to.
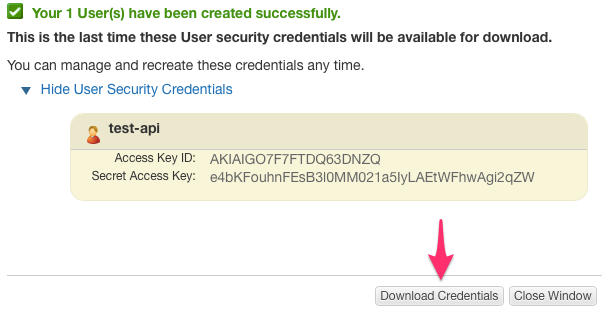
In the IAM section, you should then click on Create New Users and fill in the user name of your choosing. Personally I prefer a recognisable name like api-access, but any name will work. However, make sure that the Generate an access key for each User flag is enabled. Continuing on, the next screen is the important one, and you will need to either make a note of or download the access key displayed there.
One last step is needed in the AWS Console before we can leave this graphical world behind, and that is ensuring our user has all the permissions we need. While you can finetune all of your permissions, for now we just want to have a user we can use for everything.
In this case that means full access to everything except user management. There is a predefined permission for that, so let’s just use that. To set this, first select your created user and then in the Permissions tab choose to attach a user policy. You can then select Power User Access.

Setting up a profile
The last part of the setup is to configure your profiles. While you are simply playing around it is likely that you will only have a single profile, but if you use different regions or even different AWS accounts you will need more than one. Having a profile also makes it easier to prevent accidents from happening where you do things in the wrong region.
You can define the profile you use in your commands by adding --profile profilename to your AWS commands. My examples at the beginning of the article did this for my blogs profile. If you don’t specify a specific profile, AWS will fall back to your default profile.
This is done by creating a config file in ~/.aws/config. This file has a very simple structure. You define the name of the profile; and this is followed by your prefered output type (json, text, or table), the region, and the access key information we collected earlier. Any of these can be overridden when you run your commands, but having them defined is easier.
As an illustration the below setup is based on the credentials I used earlier.
Before you try if these keys work, that user was deleted before I posted this article.
[default]
output = json
region = us-east-1
aws_access_key_id = AKIAIGO7FFTDQ63DNZQ
aws_secret_access_key = e4bKFouhnFEsB3I0MM021a5lyLAEtWFhwAgi2qZW

[profile sydney]
output = json
region = ap-southeast-2
aws_access_key_id = AKIAIGO7FFTDQ63DNZQ
aws_secret_access_key = e4bKFouhnFEsB3I0MM021a5lyLAEtWFhwAgi2qZW
Trying it out
In future articles I will give more examples of what you can do with this, but the best way to start is by reading a bit through the user guide I mentioned before and playing around a bit.
The CLI tools give you good access to documentation at every level by including the help command. That means you can run aws s3api help for help on the general commands available for the s3api, or you can run aws s3api put-object help for the details and arguments for the put-object command.
One last tip, while you’re playing around it might be a good idea to either restrict your playing to a region where you don’t have anything running, or even just use a completely new AWS account. As the API is built for efficiency, that also means there are no confirmation requests when you delete something. Besides, using a completely new AWS account means that you can make use of the free tier while playing.
Read more like this:
- Introduction - Don't Ignore the AWS CLI
- Aqua: Easy API Gateway creation
- Setting up Lambda and a gateway through the CLI
- Setting up SSL for an ELB
- Week 22, 2019 - AWS Backup CloudFormation; EBS Encryption; AWSCLI Tips
Or always get the latest by subscribing through RSS, Twitter, or email!